AVEVA OMI lets you play back historical data from a Historian server through an IData connection. Users can switch between real-time mode and historical playback mode, provided that historization has been enabled for the data points.
ViewApp Playback attributes can be used with symbol animations or action scripts to provide the functionality to show selected historical data. The symbol's graphic elements incorporate animations or scripts with Playback attributes set as reference values to provide the equivalent functionality of media player controls. For example, you can include a switch graphic element associated with the Boolean Enabled attribute that powers on the media player symbol.
To enable historical playback
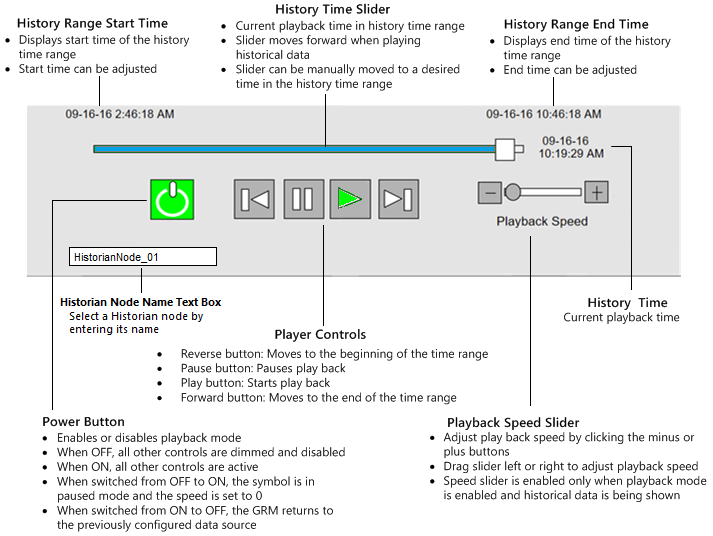
- Create a media player symbol in which you associate playback attributes with the various elements of the media player. For example, associate the MyViewApp.Playback.Enabled attribute with the media player power button, and the MyViewApp.Playback.Playing attribute with the play symbol. A typical media player symbol looks something like the following illustration, and has similar capabilities, enabled through the attributes provided in the Playback namespace:
- Add a text box to the media player symbol and link it to the MyViewApp.Playback.HistorianServer attribute. Users can enter a node name in the text box to connect to different Historian servers at run time.
- Manually deploy the playback service that will play the historical data, as described below.
To deploy the playback service
- Open the ArchestrA IDE.
- Select Galaxy from the menu bar, and then select the Configure option.
- Select ArchestrA Services.
- Select ASB.HistoricalDataReplayService.1.0 and press Ctrl + N to create an instance.

- Right-click on the instance name and select the Rename Node option.
- Give the instance the same name as the Historian node machine name.
-
Right-click on the instance and select the Deploy option to deploy the service. The deployed location of the service is unimportant and can be anywhere within the galaxy.